Saturday, August 31, 2013

Dress up your bed with a pretty pillow case

Do you have some lace trim that you have knit or crocheted and need to do something with it? 

Check out this lovely post on AT HOME ON THE BAY, and make your own pillowcases to dress up your bed.


Materials for One Standard Pillowcase with Lace Trim:
1 yard of 45″ wide fabric
 1-1/2 yards of trim
 coordinating thread
sewing machine, iron, scissors, pins
Are those pillowcases beautiful? It is a great idea to use such pretty print fabric. I need to get cracking!

Enjoy, Debby

Wednesday, August 28, 2013

Second video on tatting...double knots and picots

In the second video of our Shuttle Tatting series, you’ll learn how to start your tatting as Kelley shows you how to work double knots and picots.

Working alongside the book Easy Tatting, Kelley will also show you how to close your circles and start a new motif, in addition to a few tips and tricks.


Tatting patterns from my ETSY store:

Tatted Rose Doily Medallion $1

Tuesday, August 27, 2013

Video to get started with tatting...

Want to learn how to tat? Here is the first video from KnitPicks on Shuttle Tatting.

Published on Aug 21, 2013 by KnitPicks
Join Kelley as she rediscovers the art of tatting! In the first video of our Shutting Tatting series, Kelley gives you a brief overview of tatting and shares a few tatting books that you'll want to have in your crafting library. Finally, Kelley goes over the supplies you'll need and shows you how to wind your yarn onto the bobbin! 


I need to get my shuttle out! Debby

Tatting patterns from my ETSY store:
Tatted handbag $1

Tatted Rose Doily Medallion $1


Saturday, August 24, 2013

Hand knit shawl in Fuchsia cotton

I have been knitting up a storm and have this first shawl listed for sale on ETSY.


This hand knit shawl was made by me using my Gypsy Lace knitting pattern. The yarn is a very soft cotton called Flake Cotton from Ironstone Warehouse. It is thick and thin with nubs which creates a nice textured fabric that looks comfortable and casual. The color of this shawl is a rich fuchsia.

I also have more of this yarn in Teal, Crocus yellow and Peach. Please contact me if you are interested in a shawl in any of these colors. I will send you a photo of the ball of yarn so you can see the color.

It is a semi circular shawl with eyelet rows and a lace border drawn out to points.

It measures approximately 17 inches from the center back to the bottom edge and 40 inches tip to tip along the top edge.

Hand wash, lay flat to dry. Press lightly and block to re-establish the shape and points of the lace border.

Crochet collars for children 1870

Here are some instructions to crochet "frills" for children. You could use this to make some pretty collars for a girl's dress.


Enjoy, Debby

Thursday, August 22, 2013

Tuesday, August 20, 2013

Knitting stitch from 1879

Here is an interesting textured knitting stitch as found in Peterson's Magazine from 1879.

An explanation of their knitting terms can be found here.

Happy knitting, Debby

Craftsy Photography Courses Craftsy’s goal is to revolutionize online education by allowing photography enthusiasts to go on location with world-class instructors, learn professional techniques and engage with instructors and fellow students. Craftsy courses are highly interactive, allowing students to ask questions, make digital video notes, and learn using the latest tools. Check out the great course offerings currently available:
  • Shoot It: Product Photography Class - You don't need expensive software or a super-fancy camera to take great photos - just the knowledge you'll get in this essential class.
  • Kirk Tuck: Studio Portrait Lighting - Let photographer Kirk Tuck show you the equipment, setup and lighting techniques you’ll need to create alluring, professional-quality studio portraits.
  • Portraits With an On-Camera Speedlight - Use light to bring your portraits to life! Harness available light and learn advanced on-camera flash techniques with Neil van Niekerk.
  • Landscape Photography: Great Sand Dunes - Journey through stunning sand dune vistas with photo guru Rick Sammon & elevate your landscape photos from bland to breathtaking in this online class.
  • Shooting Intimate Landscapes - Turn the ordinary into the extraordinary! See beauty on a small scale and find intimate landscapes anywhere with photographer Rob Sheppard.
  • Off-Camera Flash Photography with Neil van Niekerk - Put your subjects in their best light no matter what the setting by taking your speedlight off-camera and creating fantastic portraits with Neil van Niekerk’s expert flash techniques.

Monday, August 19, 2013

Gustav Stickley and Smocking

What does Gustav Stickley and smocking have to do with each other? The Craftsman Magazine from 1906 ran an article about the art quality of smocking. You can find the article here on page 676


This is a fascinating magazine. Search the term HOME DEPARTMENT and you will find the articles within the magazine on how Stickley imagined that a home should be artfully designed and decorated.

Enjoy, Debby

Sunday, August 18, 2013

Child's crochet cowl and circle jacket...free patterns.

I love Drops design at garnstudio.com. Here are two crochet patterns for children.


Create this cute cowl for a child you love.


NECK:
Size: 3/5 - 6/9 - 10/12 years
Circumference at the top: 47-51-56 cm

Materials: DROPS KARISMA from Garnstudio
200-200-200 g colour no 64, grey purple

DROPS CROCHET HOOK SIZE 4 mm – or size needed to get 17 tr = 10 cm in width.


And a pretty circle jacket


Size: 3/5 - 6/9 - 10/12 years
Size in cm: 98/110 - 116/134 - 140/152
Chest measurements: 54/58 - 60/66 - 70/76 cm
Materials: 
DROPS PARIS from Garnstudio
300-350-400 g colour no 31, medium purple

DROPS CROCHET HOOK SIZE 5 mm – or size needed to get approx. 13 tr in width x 10 rows with pattern on sleeves = 10 x 10 cm. 

Enjoy, Debby

Friday, August 16, 2013

Traditional knit shawl patterns from 1950

I love lace baby shawls and this booklet has a lovely collection of traditional knit shawl patterns and a few lace head coverings. You can find this booklet at the Antique Pattern Library.

Here are a few photos to get you going.

Now that's a border!


And a crocheted item as well.


Enjoy, Debby

Wednesday, August 14, 2013

Historic knitting....8 cast on techniques from 1886

Here are some different techniques for casting on from:

ENCYCLOPEDIA OF NEEDLEWORK

BY THÉRÈSE DE DILLMONT - 1886


FIG. 341. POSITION OF THE HANDS IN KNITTING.Fig. 341. Position of the hands in knitting.
Casting on.—Casting, or, setting on, as it is sometimes called, is the formation of the first row of stitches which are to constitute the foundation of the work.
There are four methods of casting on: (1) crossed casting on, done in four different ways; (2) knitting on; (3) slipping on, also done in two ways; (4) casting on with picots.
(1) Crossed casting on with a single thread (fig. 342). Lay the thread over your fingers as though you were beginning a chain of plain stitches, fig. 403, leaving a long end, sufficient to make the number of stitches required, lying within the palm of the hand. Put the needle in from below, into the loop on the thumb, and pass it from right to left under that part of the thread which lies between the forefinger and the thumb. Then bring the thread through the loop on the thumb, draw the thumb out, and lay the loop on the needle. In making the next stitches, lay the thread over the thumb, so that the end lies outside. Put in the needle under the front thread and complete the stitch as before. This method of casting on is generally done over two needles, one of them being drawn out before the knitting-off is begun, to ensure a loose edge.
FIG. 342. CROSSED CASTING ON WITH A SINGLE THREAD.Fig. 342. Crossed casting on with a single thread.
Crossed casting on with a threefold thread.—This method is similar to the last, only that the thread is taken threefold and is drawn by the needle through the loop, which is formed at the bend of the thread. Then you pass the single thread over the left hand, and the triple one over the thumb, as shown in fig. 342, and make the same stitches, as above. The threefold thread makes a broad chain at the bottom of the loops.
Double crossed casting on (fig. 343).—This can be done either with a single or a threefold thread. In our drawing it is done with the latter. The first stitch is made as we have already described, only that you have to keep the loop on your thumb, put the needle into it a second time, lay hold of the thread behind, cast on a second stitch, and then only, withdraw your thumb. In this manner two loops are made at once, close together.
FIG. 343. DOUBLE CROSSED CASTING ON.Fig. 343. Double crossed casting on.
Crossed casting on, forming a chain (fig. 344.)—Begin by making one such stitch, as we have described in fig. 341; for the second and following stitches, bring the end of the thread to the inside of the palm of the hand, so that it lies between the thumb and the forefinger.
FIG. 344. CROSSED CASTING ON, FORMING A CHAIN.Fig. 344. Crossed casting on, forming a chain.
(2) Knitting on stitches (fig. 345).—Begin with a plain crossed stitch; then take the thread and the needle in the left hand, a second needle in the right, and catch it into the stitch on the left needle, lay the thread under the right needle and draw it through in a loop, through the loop on the left needle. Then transfer it as a fresh stitch to the left needle; catch the needle into this second stitch, and draw the thread through it, to form the third, and so on.
This method of casting on is used for articles, that are to have a double edge, (see figs. 355356), because stitches, made in this way, are easier to pick up than the tighter ones; but it should not be used, where it will form the actual edge, as the loops are always too open.
FIG. 345. KNITTING ON STITCHES.Fig. 345. Knitting on stitches.
(3) Casting on with slip loops (fig. 346).—Begin by casting on one loop in the ordinary way, next, lay the thread, as in German knitting, over the left hand, twisting it once only round the forefinger, then put the needle in, upwards from below, under the thread that lies on the outside of the forefinger; draw out the finger from the loop, put the loop on the needle to the right, take the thread on the forefinger again, and so on.
FIG. 346. CASTING ON WITH SLIP LOOPS.Fig. 346. Casting on with slip loops.
Casting on with double slip loops (fig. 347).—Begin by casting on a stitch in the ordinary way, then lay the thread over the forefinger, the reverse way, so that it crosses between, not outside the hand and the body of the knitter. Pass the needle upwards from below, under the inside thread, and slip this thread as a loop on to the needle. Continue to cast on, inserting the needle under the front and back threads alternately. This method is specially suitable for open patterns, where you have to increase several times, in succession.
FIG. 347. CASTING ON WITH DOUBLE SLIP LOOPS.Fig. 347. Casting on with double slip loops.
(4) Casting on with picots (fig. 348).—Cast on two stitches in the ordinary way and turn the work. Lay the thread over the needle, put the needle into the first stitch, from right to left, and slip it on to the right needle, knit off the second stitch plain, and draw the slipped one over it.
FIG. 348. CASTING ON WITH PICOTS.Fig. 348. Casting on with picots.
Cast on as many stitches as you want in this manner and then pick up the picots thus formed, with an auxiliary needle, and knit them off like ordinary stitches.
This method of casting on may be varied thus in the following manner: having cast on the stitches as in fig. 348, throw the thread over the needle and knit two stitches together.
Enjoy, Debby

Tuesday, August 13, 2013

more from 1886..an idea for a lace and cable scarf

More notes from the Encyclopedia of Needlework.

I think that this stitch would make a great scarf with fingering weight yarn and large enough needles to make the laciness of it stand out.


Knitting pattern with dropped stitches —Cast on a number of stitches that divides by 9.

1st row—over, slip 3, knit 1, 2 overs, knit 3, 2 overs, knit 1.
2nd row—knit 3, slip the next, drop the 2 overs, knit 4, turn the work, purl 4, turn the work, knit 4, drop the 2 overs, slip the next stitch.
3rd row—over, slip 2, knit 1, pull slipped stitches over, drop the first of the 4 stitches, knit first the stitch that follows the second double over, then the 4 others plain, and lastly, take up the dropped stitch and knit it plain on the right side of the work.
4th row—knit plain.
5th row—over, slip 3, over, knit 6.
6th row—knit plain, and repeat from the 1st row.
Enjoy, Debby
Free Cake Decorating Recipes at Craftsy!

Monday, August 12, 2013

Historic knitting...1886

Today's post is from a historic needlework staple, The Encyclopedia of Needlework by Therese de Dillmont

From Wikipedia, the free encyclopedia

Thérèse de Dillmont (10 October 1846 - 22 May 1890) was an Austrian needleworker and writer, "one of the most important pioneers in the international and multicultural enterprise of hobby needlework in the late nineteenth century". 

Dillmont's Encyclopedia of Needlework (1886) has been translated into 17 languages.

I have chosen this round piece to try myself. It can be used a variety of ways...as a washcloth, doily, small bride's purse or the crown of a baby bonnet. Send over a photo of your work if you give this a try!

You can find this resource on ProjectGutenberg and Archive.org. I also see reprints of this book on the shelves at thrift stores. 


Materials: Fil d'Alsace D.M.C in balls, No. 60 or 70, Fil à dentelle D.M.C No. 40, 50 or 60.
Rose for knitting —Repeat all the directions, 8 ending with the sign *, 7 times.

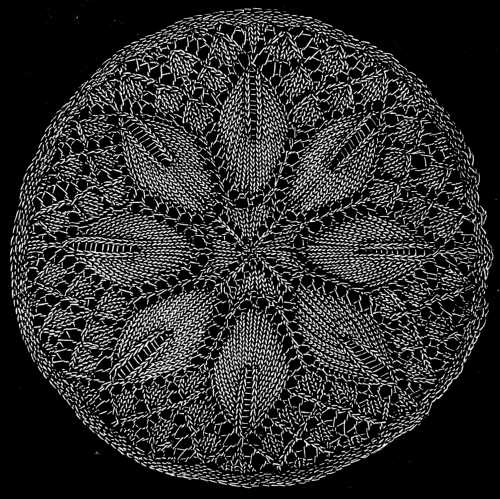
Cast on 8 stitches, on to 4 needles, two on each; close the ring.
2nd round—8 times: over, knit 1.
The 3rd, 5th, 7th, 9th, 11th, 13th, 15th, 17th, 19th, 21st, 23rd, and 25th round, knit plain.
4th round—over, knit 3, over, knit 1 from behind *.
6th round—over, knit 4, over, knit 1 from behind *.
8th round—over, knit 7, over, knit 1 from behind *.
10th round—over, slip 1, knit 1, pull slipped stitch over, knit 2 together, over, knit 1 *.
12th round—over, knit 2 together, over, knit 3 *.
14th round—over, knit 1 from behind, over, knit 5 *.
16th round—over, knit 1 from behind, over, knit 7 *.
18th round—over, knit 1 from behind, over, knit 9 *.
20th round—over, knit 1 from behind, over, knit 11 *.
22nd round—over, knit 1 from behind, over, knit 13 *.
24th round—over, knit 1 from behind, over, knit 15 *.
26th round—over, knit 3, over, knit 5, knit 2 together, purl 1, slip 1, knit 1, pull slipped stitch over, knit 5 *.
27th round—knit 11, purl 1, knit 6 *.
28th round—over, knit 5, over, knit 4, knit 2 together, purl 1, slip 1, knit 1, pull slipped stitch over, knit 4 *.
29th round—knit 12, purl 1, knit 5 *.
30th round—over, knit 1, over, slip 1, knit 1, pull slipped stitch over, knit 1, knit 2 together, over, knit 1, over, knit 3, knit 2 together, purl 1, slip 1, knit 1, pull slipped stitch over, knit 3 *.
31st round—knit 13, purl 1, knit 4 *.
32nd round—over, knit 3, over, slip 2, knit 1, pull slipped stitches over, over, knit 3, over, knit 2, knit 2 together, purl 1, slip 1, knit 1, pull slipped stitch over, knit 2 *.
33rd round—knit 14, purl 1, knit 3.
34th round—over, knit 11, over, knit 1, knit 2 together, purl 1, slip 1, knit 1, pull slipped stitch over, knit 1 *.
35th round—knit 15, purl 1, knit 2.
36th round—over, knit 1, over, slip 1, knit 1, pull slipped stitch over, knit 1, knit 2 together, over, knit 1, over, slip 1, knit 1, pull slipped stitch over, knit 1, knit 2 together, over, knit 1, over, knit 2 together, purl 1, slip 1, knit 1, pull slipped stitch over *.
37th round—knit 16, purl 1, knit 1.
38th round—over, knit 3, over, slip 2, knit 1, pull slipped stitches over, over, knit 3, over, slip 2, knit 1, pull slipped stitches over, over, knit 3, over, knit 2, over, slip 2, knit 1, pull slipped stitches over *.
39th, 41st and 43rd round—knit plain.
40th round—over, knit 4, knit 2 together, over, knit 5, over, slip 1, knit 1, pull slipped stitch over, knit 4, over, knit 1.
42nd round—knit 1, over, slip 1, knit 1, pull slipped stitch over, knit 1, knit 2 together, over, knit 1, over, slip 1, knit 1, pull slipped stitch over, knit 1, knit 2 together, over, knit 1, over, slip 1, knit 1, pull slipped stitch over, knit 1, knit 2 together, over, knit 2 *.
44th round—knit 2, over, slip 2, knit 1, pull slipped stitches over, over, knit 3, over, slip 2, knit 1, pull slipped stitches over, over, knit 3, over, slip 2, knit 1, pull slipped stitches over, over, knit 3 *.
Finish with three purled rounds.

Sunday, August 11, 2013

New Paton's Lace yarn...with sequins!

I like Paton's Lace yarn. It a reasonably priced product. It is made of a combo of acrylic, mohair and wool. (80% Acrylic, 10% Mohair, 10% Wool).
Then, I couldn't find it anywhere.... 

Now they have Lace with Sequins. I just ordered some from Joann.com and I have a shawl on the needles now. The sequins are small but they add a nice sparkle. I like the little bit of fuzziness that the mohair adds WITHOUT itchiness.


I designed my Garter Stitch Diamond Lace shawl with Patons Lace. Give it a try with the new yarn with sequins.


The scarf and wrap version of this pattern can be made up in Lace with Sequins too.


I am going to make a Dripping with Lace shawl with this yarn next.

Use coupon code ILUVBLOG15 for 15% off at my ETSY store.

Have a safe weekend, Debby

Friday, August 9, 2013

Instructions for crochet tatting 1867

Have you heard of cro-tatting or crochet tatting? 

It is an interesting combination of tatting with a crochet hook. 

I have found some interesting resources for you 

Enjoy, Debby

Tuesday, August 6, 2013

more buttons...Singleton and Suffolk puffs

Back to buttons...

Here is info on making Singleton buttons


From the WI (Women's Institute) web site:

These beautiful handmade buttons are a lovely way of making matching buttons for your sewing projects, at little cost! Related to woven Dorset buttons, they are a traditional British ‘thrift craft’ worked on rings, using small amounts of fabrics, so great for your scrap pieces and leftovers! You can even use them in jewelry, to embellish bags or change boring buttons on coats and jackets.

Their name comes from the Dorset Singleton family, who first made them in the 1600’s.

Once you get used to making these, one can be completed in less than an hour, so don’t let the lengthy instructions put you off, they are fun to make and extremely pretty!

Instructions to make you own are here.

One more style of button: Suffolk Puffs 

Suffolk puffs or Yo-Yo's, as they are called in America, can change a boring button into a design feature.


Download instructions here.


Enjoy, Debby

New classes on Craftsy
French Cooking at Home: The Food of Provence with Georgeanne Brennan

Cake Design Made Simple: Art Deco with Lindy Smith 

Monday, August 5, 2013

Great idea for a baby bib...

Knitted Easy Stay-On Bib with a ribbed collar! 


And for the crocheters...this is a lovely filet crochet set.


I love bibs for baby shower gifts. If you make some now, you will have them for the next shower you are invited to.


Friday, August 2, 2013

A peek at a girl's life in 1836...

I found some funny material from 1833 and 1836 on girl's exercise! Listen to this quote: "Dancing--that device of the devil, must be banished, and in its stead, Calisthenics must hold sway." from American Annals of Education and Instruction 1836.

Here are some of the exercises that young ladies could perform. You will love the illustrations of the ladies in Regency dresses!


More fun than a workout video from the 1980's!

Enjoy, Debby


Thursday, August 1, 2013

Prince of Cambridge's knitted shawl

Knitting for a future King – Part 2


Following Knitting Industry’s article last week – ‘Knitting for a future King’, leading flat knitting machine manufacturer Stoll has today confirmed that Britain’s new Royal Baby, His Royal Highness Prince George of Cambridge, was indeed seen in public for the first time in a luxury flat knitted lace shawl knitted on a Stoll machine. The shawl was knitted at the German company’s long established customer G.H. Hurt & Son of Nottinghamshire, England. - See more at: http://www.knittingindustry.com/knitting-for-a-future-king-part-2/#sthash.nUxjimC6.dpuf

Happy knitting, Debby

Homemade Italian Pasta with Giuliano Hazan
Designer Fondant Textures
The Classic Self-Portrait with Kerry Dunn

LinkWithin

Related Posts Plugin for WordPress, Blogger...